Tomato Blight – 4 (All Natural) Prevention Tips

The tell tale signs of tomato blight have hit us extra early this year.

It doesn’t normally show until the fruit are a good size, so we can just remove the leaves and let the fruit ripen on the stem. However, this is the earliest I have ever known blight to rear its ugly head, and the plants are still too young to have fruits on yet.

What is Tomato Blight?

According to the Royal Horticultural SocietyPotato and tomato blight is a disease caused by a fungus-like organism which spreads rapidly in the foliage and tubers or fruit of potatoes and tomatoes in wet weather, causing collapse and decay.

In my experience, it normally appears on the lowest leaves of tomato plants first, as a brown withering of the leaf. If left to its own devices, it will travel up the plant killing all the leaves (remember the importance of leaves in photosynthesis?) and eventually rots any tomatoes on the plant.

How Does It Spread?

The microscopic spores from an infected plant get blown on the wind (from other gardens & growers) which on their own are pretty benign. However, throw into the equation the correct environmental conditions – warmth and wetness (ie the past 5 British summers) and the spores begin their deadly march through the tomato & potato patch.

Interestingly, the spores can also over-winter in infected potato tubers in your soil so another good reason to have a good clear up at the end of the growing season.

Personally, I choose not to spray chemicals on my food plants, but I believe there are sprays you an buy to halt or stop an infection. I have also heard that a mixture of milk & water sprayed onto leaves will help/halt/prevent an infection. I’ll be trialling this during the summer and let you know how I get on.

Here’s my plan of attack.

1/ Moisture

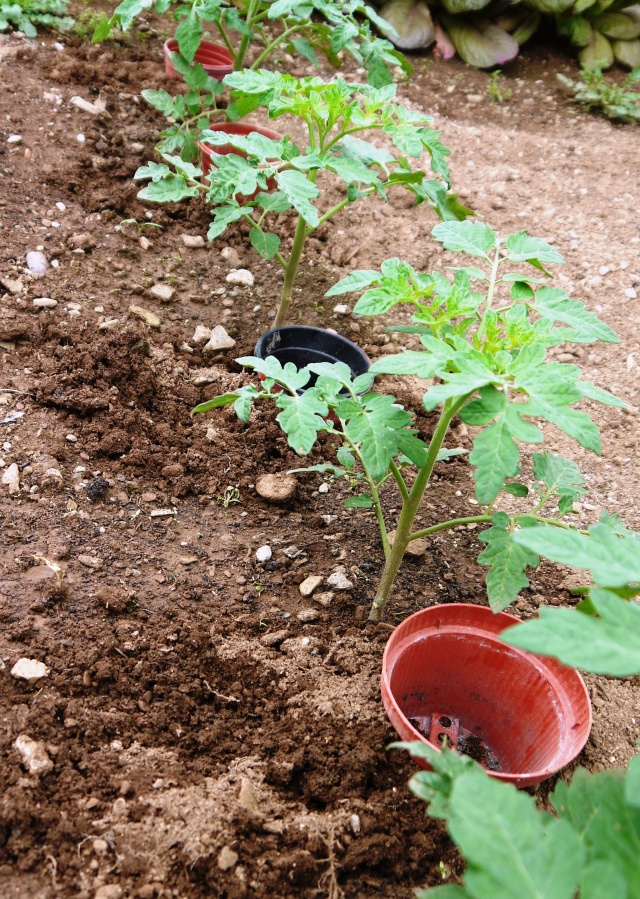
To keep the leaves of our plants dry when watering them, I sank small plant pots into the ground next to the plants. Rather than splashing water all over the leaves and stalk (and activating those spores) with the hose pipe, the water now goes directly to the roots instead.

Tomato Blight Prevention

2/ Ventilation

A lack of planning at the start of our growing year meant that some of our plants were crowded by other plants. I removed these tomato plants (burning them just in case they were already infected)

I also removed the lower leaves from all the tomato plants that were touching the soil creating an overall drier and more ventilated environment.

As a poly tunnel gets very warm and moist when the doors are closed, the doors are left open overnight when it’s not too cold or windy.

3/ Disease Control

Once you already have an infection, you’ll need to be careful in how you deal with the infected parts as everything they touch (including your hands) creates a possible reinfection.

We now have a ‘blight bucket’ which all the diseased parts go into before being emptied into a dustbin and burnt.

Burning Tomato Blight

4/ Successional Planting

As the very young plants don’t seem to get infected, I read somewhere that staggering the planting of tomatoes throughout the season can work as the late summer is usually drier than early summer. Not sure this applies to Cornwall but I’m staying on the positive side of positive as I LOVE our fresh tomatoes!

What have you found to work against the blasted blight?

Featured on Frugally Sustainable Blog Hop

Posted in Cornwall, Frugal Food, Permaculture, Smallholding | Tagged | 2 Comments

His & Hers :)

Jonny carved us matching wooden bangles. How cute!

Wooden Bangle

Posted in Happiness | Leave a comment

And The Winner Is…

Bridget from ArignaGardener!

Congratulations Bridget! Can you let me have your address please petal?

Don’t go anywhere if you didn’t win as I suspect there’ll be another give-away for next months Free Range Friday :)

Posted in Chickens, Free Range Friday, The Old Bids | 2 Comments

Free Range Friday Chicken Art GIVEAWAY!!!

Once again, in honour of the work the good folk over at The British Hen Welfare Trust do, I shall be giving away a mounted print this month to help them raise awareness.

This month I think we’ll plump for ‘Ida’s Tealeaves’!

Fancy winning? All you need to do is leave a comment below. Please feel free to share with your friends on Facebook & Twitter too!

Anyone can enter, no matter where in the world you are. Contest open until 12 midnight (GMT) on the 1st June 2012.

Good luck!

PS find out how you can get involved in Free Range Friday by going to The British Hen Welfare Trust Website.

Posted in Chickens, Free Range Friday | Tagged | 14 Comments

We’re in the Party Spirit!

Mum & I decorated the farm today for the Queen’s Diamond Jubilee and we laughed so much hanging this stuff through the orchard!

I hope you enjoy your extended holiday weekend!

Posted in Happiness | Tagged , | Leave a comment

Home-Made/Grown/Laid Breakfast

Home laid eggs.

Home grown spinach.

Home made bread.

Just need to make my own mustard and I’d be onto a winner :)

Posted in Chickens, Happiness | 2 Comments

I Won! (A Rather Delayed, Yet No Less Excited Post!)

The lovely Mrs H from Tales of Mrs H fame, recently pulled my name out of a hat to win one of her gorgeous lavender bags! How lucky am I!

It is gorgeous, and scents our bedroom beautifully. Thank you so much Mrs H, I feel all spoilt and patriotic!

Visit Tales of Mrs H here

Posted in Happiness | Tagged , | 4 Comments

5 Top Tips For Newbie Bread Bakers

I’ve ‘tried’ making bread in the past and just assumed I wasn’t any good at it. What I now realise is, as with pretty much everything else in life, practice pays off!

I’m currently baking about 8 loaves a week, some for us, some for my parents and some for the freezer.

Whilst I by no means claim to be an expert on the subject, I have now made enough errors & discoveries to be able to turn out an edible loaf (and occasionally an epic loaf!) every time.

Although the smell of a freshly baked loaf is adorable, for the me the absolute best smell of the whole process, is when you take the proofed dough out of the plastic bag to knock back. The sweet, yeasty scent is incredibly evocative. It’s just wonderful.

Here’s my top 5 tips to help you if you’re new to the tasty world of bread baking!

1/ Increase the Water

It took me a while to understand why my dough never became elastic or smooth. Every recipe I’ve tried made a dusty, dry, cracked dough that wouldn’t stretch or spring like I’d seen other peoples. Until I upped the water content – Bingo!

Try adding up to an extra 10% warm water to your mix if you have this problem.

2/ Set the timer

Kneading changes the structure of gluten in flour, and it’s vital to getting a light loaf. You can feel a change in the dough after 6-8 minutes of kneading, but initially, keep going for 10 minutes. 10 minutes is a surprisingly long time, and very hard to judge when you first start out, so set the kitchen timer and zone out. It’s very satisfying.

3/ Try Cold Proofing

I have found that when I proof in a warm place (ie the airing cupboard) the dough may rise quicker, but the resulting bread is more dense and stales more quickly.

However, cold proofing (in the fridge over night or just on a kitchen work surface until doubled in size) has worked brilliantly for me. Try it, and let me know what you think.

4/ Proof Twice

Again, a lot of recipes suggest only proofing once. Whilst this certainly leaves you with an edible loaf of bread, the loaves I’ve proofed twice have tasted amazing. Seriously.

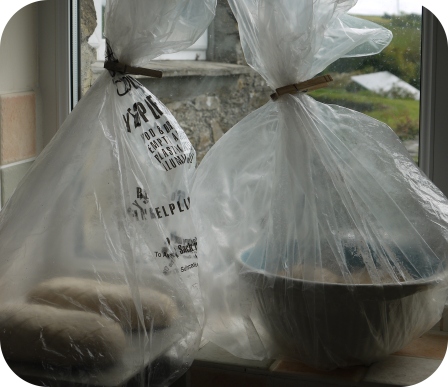
I mix, then knead my dough and put it in an oiled bowl. The entire bowl goes in a huge clear plastic bag (making sure the bag & dough won’t touch as it’s not a food grade plastic bag) and leave on the windowsill or counter.

When it’s doubled in size (can take 2 or more hours depending on temperature) take out of bowl, knock back, form the loaf shape you want in a loaf tin or on a baking sheet. Put the tin/sheet back into the bag to double in size again (this time doesn’t seem to take as long as the first proof). When fully risen, put straight into hot oven.

5/ Double Up Recipe & Freeze

Making bread takes a fair amount of time and electricity. Double up your recipes and freeze the extra, they’ll taste just as good when defrosted, unlike shop bought bread.

And as an afterthought;

6/ Look on Youtube

I think I learnt pretty much all I needed to know on Youtube! These are a few of my favourite videos, but there are loads out there!

How to Knead

How to get different shaped loaves

Toppings anyone?

And lastly, this one is brilliant to watch but looks so exhausting!!!

If you’ve never delved into the doughy world of baking breads, I hope this has inspired you. Have fun with it, play around by mixing different flours or adding seeds, nut, olives, (soaked) dried tomatoes/onions/mushrooms, anything you fancy really!

Enjoy :)

Posted in Frugal Food, Happiness, Recipes | Tagged , , , , | 10 Comments

Breaking News!

I have had such great feedback from you all (THANK YOU!!!) regarding my silly chickeny cartoons, that I’ve bitten the bullet and been to see a local printer. Eek!!!

After much deliberation, I’ve plumped for a bunch of cards and some prints (there’s more in the pipeline too, but that’s for another day :)

So today I’ve been buried in the depths of Facebook, building a little shop to house them all. I can’t wait to share it with you all!

And for those of you not on Facebook, here’s my logo that I designed last week. What do you think…?

So, that’s it. I’m off for a well deserved cup of tea now! Thank you again for all your kind words and support, you guys totally rock <3

Posted in Chickens, The Old Bids | Tagged , , , | 9 Comments

The Old Bids ~ The Olympic Torch Comes to Cornwall!

Posted in The Old Bids | Tagged , , , , , | Leave a comment